Friday, August 19, 2022

DIY Water Gauge : STEM project

 Happy Friday in the Garden : 

We are learning about Rain-  Have fun with this easy STEM  project to do with the kids.... 


Making a Rain Gauge
  1. Cut the top section off a clear bottle as shown. ...
  2. Place several small rocks in the bottom (for weight), then fill the bottle with water to the 0 mark. ...
  3. Invert the top of the bottle into to rain gauge to act as a funnel. ...
  4. Wait for the next rain and obserCreate a log or a table to track rainfall in your area. For each entry, you’ll want to record the date, your rainfall measurement, and maybe even a sketch of the cloud cover that day. What other data might you want to record in your rain log?

    Process:

    • Keep your eyes on the daily weather forecast, or look at the sky each morning. Do you expect a lot of rainfall today? Can you predict how much?

    • Re-calibrate your gauge each morning: empty out all of the water until it’s level with the zero-mark. If the weather has been very dry, you may have to ADD a small amount of water to get up to the zero-mark, to make up for evaporation that occurred overnight.

    • Take a measurement at the same time every evening, to see how much rain fell during the day. Make a note in your log of how many centimeters and how many inches of rain fell over the course of the day.

    • Take daily measurements for one week, two weeks, or one month. Do you see patterns emerging? Does your ability to predict daily rainfall based on cloud cover become more accurate over time? Why do you think that is?

    ve and record rainfall amounts.

Wednesday, August 17, 2022

Wise Craft: Turning Thrift Store Finds, Fabric Scraps, and Natural Objects Into Stuff You Love


Wise Craft: Turning Thrift Store Finds, Fabric Scraps, and Natural Objects Into Stuff You Love 


Wise Craft is a guide to the homemade life, turning old things into special new objects that enhance the home. Based on the popular blog of the same name, this guide focuses on creating a homemade atmosphere that reflects your family, without spending a fortune. Instead of throwing away old shirts and boring dishes, or passing up thrift store finds that aren't quite right, author Blair Stocker teaches how to remake, adding special touches to make them work for her home -- and yours . The book is divided into four seasonal chapters, with designs that reflect different holidays and the changing seasons, allowing you to update your home according to the weather outside. Many projects are portable or perfect to do during a family movie night, making the Wise Craft lifestyle an easy one to attain.

Sixty projects include May Day cones and recycled floral mirror frames -- perfect for a teenager's room -- plus throw pillow updates, a picnic blanket made from a pile of men's shirts, spooky Halloween dishes, advent calendars, and recycled gift jars. Beautiful photography and illustrations make each project a snap, no matter your crafting background.

Book Pick: 

It contains a great variety of projects - 60 in all! - divided by season. They range from simple and easily done in an hour or so to more in-depth, detailed and long-term crafts. There is sewing, paper crafting, crochet, knitting and more. Many of the projects use found items or thrift store buys. Very clever! The photography is beautiful and the project directions are straight-forward and easy to follow

Saturday, August 6, 2022

DIY Crayon Craft

 Recycled Crayon Frame 

One of my favorite smells of BTS is of New Crayons! But I like to take the old  used and broken crayons in crafts. Today's crafts is a picture frame made from crayons glued around a picture. 


  • cardboard base 
  • BTS paper 
  • Glue
  • Crayons. 
Cut your cardboard to size to  want, layer down paper and pictures, Then glue crayons around -end to end. Let dry. You can hang or but a Magnet on back for a cute Fridge magnet. 

Friday, August 5, 2022

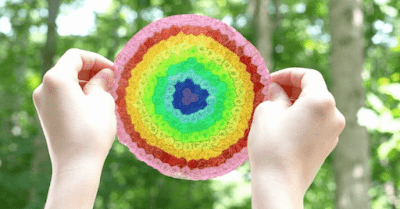
DIY: Garden Suncatcher

 DIY: Garden Suncatcher 


In the Garden this Friday with Yard Art ! 


  • assorted pony beads
  • Metal pie pan
  • toothpicks 
  • something to make whole.
  • yarn for hanging 
  • Oven 

  • Have the kiddos start to build a design in the tin pan.  Have them start in the middle and work outwards. Provide toothpicks in case a bead gets flipped over and the kids need to carefully flip it back without disturbing the other beads in their sun catcher design. 

    When the children have finished their pan designs preheat the oven to 400 degrees and place the pans in the oven.  Leave the pans in the oven for 30 minutes. If possible open some windows for ventilation (the smell can get pretty bad).  

    After 30 minutes check the pan to see if all of the bead have melted together and there are no holes.  If the sun catcher is ready, take out the pan using a potholder and put it on the stove top to cool. If the sun catcher is not ready give it 10 more minutes.

    After the pony bead sun catcher is removed from the oven wait a few minutes then take a toothpick or wooden skewer and poke a small hole in the top (this will be where the string goes through).

    Then let the sun catcher harden for at least 30 minutes.

    After the plastic has hardened and cooled cut a 2 ft piece of string or yarn and put it through the hole.  Then tie the string and hang your sun catcher in a window or outside!


    Spring Bbq event

    Every Spring the volunteer fire department puts on a BBq to raise money for supplies.  Here's a fun page I made from pictures I took at ...